Easy Guide to Installing Metal Roof Light Panels for Bright, Durable Roofing
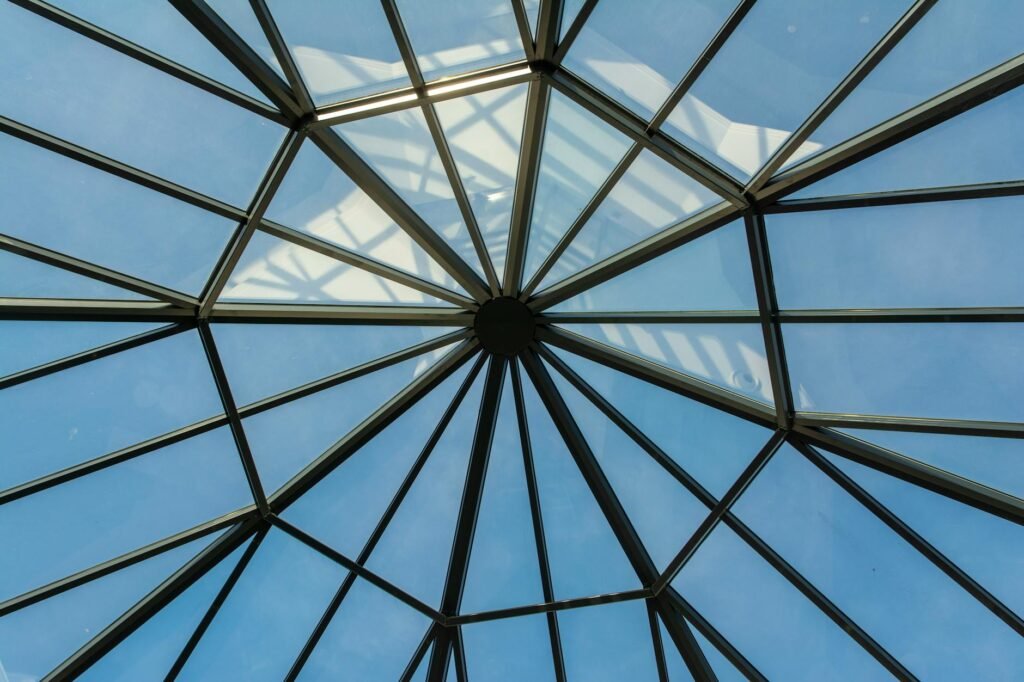
Metal roof light panels are an excellent solution for homeowners and builders who want to combine durability with natural daylighting. These translucent or transparent panels integrate seamlessly into metal roofing systems, allowing light to pass through while maintaining weather resistance and structural strength. If you’re considering enhancing your roofing with metal roof light panels, this guide will walk you through the installation process to ensure a bright, long-lasting roof.
What Are Metal Roof Light Panels?
Metal roof light panels are specially designed roofing components that fit alongside or between standard metal roofing sheets. Made from materials like polycarbonate or fiberglass reinforced plastic (FRP), these panels allow sunlight to filter through, illuminating your interior spaces without compromising the roof’s integrity. Their lightweight nature and impact resistance make them ideal for both residential and commercial buildings.
Benefits of Using Metal Roof Light Panels
Before diving into installation, it’s important to understand the advantages of choosing light panels for your metal roof:
– Energy Efficiency: By increasing natural light, these panels reduce the need for artificial lighting during daytime, lowering energy costs.
– Durability: Designed to withstand harsh weather conditions, they resist UV rays, hail, and heavy rain.
– Easy Maintenance: Unlike skylights or glass panels, metal roof light panels require minimal upkeep.
– Aesthetic Appeal: They bring a modern touch to traditional metal roofing, brightening interiors with soft, natural light.
Tools and Materials Needed for Installation
To install metal roof light panels, gather the following:
– Metal roof light panels (polycarbonate or FRP)
– Standard metal roofing sheets compatible with your roof
– Self-drilling screws with sealing washers
– Metal cutting tools (tin snips, shears, or a power saw with metal blade)
– Measuring tape and marker
– Safety gear (gloves, goggles, and harness if working on a steep roof)
– Caulking or sealant compatible with roofing materials
– Screwdriver or drill
Step-by-Step Installation Process for Metal Roof Light Panels
1. Plan and Measure Your Roof Layout
Start by assessing your roof to determine the best locations for light panels. Consider areas where maximum sunlight penetration is desired, such as workshops, garages, or sunrooms. Mark the points on your roof framework or on existing purlins where panels will be installed. Make sure to follow any manufacturer’s recommendations on spacing and placement to maintain roof strength.
2. Remove Existing Metal Panels or Prepare New Roof Sheeting
If you’re retrofitting an existing metal roof, carefully remove the metal panels where the light panels will go. If installing on a new roof, position your metal roofing sheets first, leaving the marked light panel spots clear. Ensure roof decking or purlins are properly spaced and structurally sound to support the panels.
3. Cut Panels to Size
Using metal cutting tools, cut the metal roofing sheets and light panels to the necessary sizes. Avoid rough edges by using proper tools and take safety precautions to prevent injury.
4. Install the Metal Roof Light Panels
Position the light panels into the gaps between metal roofing sheets or in designated openings. Align the ribs of the panels with those of the adjacent metal sheets for seamless integration and effective water runoff.
5. Secure the Panels with Screws
Using self-drilling screws with sealing washers, fasten the metal roof light panels to the roofing framework. These washers create a watertight seal, preventing leaks. Drive screws at the predetermined intervals recommended by the panel manufacturer, usually near the ribs and edges to ensure stability.
6. Seal the Edges and Joints
Apply roofing-grade caulking or sealant along the edges, seams, and screw heads to add an extra layer of weatherproofing. This step is especially important for preventing water infiltration and wind-driven rain damage over time.
7. Inspect and Test Your Installation
Once secured, inspect the installed panels for gaps, loose screws, or uneven surfaces. On a sunny day, check for even light distribution inside your home or building. Also, test for leaks during a rainstorm or by gently spraying water over the roof.
Maintenance Tips for Long-lasting Performance
Maintaining metal roof light panels is straightforward but crucial:
– Regular Cleaning: Remove dirt, leaves, and debris with a gentle detergent and water, avoiding abrasive materials that can scratch panels.
– Check Seals Annually: Reseal edges and screw heads as necessary to maintain waterproofing.
– Inspect for Damage: Replace any cracked or discolored panels promptly to preserve light quality and roof integrity.
Conclusion
By following this easy guide to installing metal roof light panels, you can transform your roof into a bright, energy-efficient barrier against the elements. These panels not only enhance the aesthetic appeal of your property but also provide the durability and low maintenance every homeowner appreciates. Whether you’re a DIY enthusiast or hiring professionals, understanding the installation process helps ensure a successful and lasting upgrade to your metal roofing system.